
Table of Contents
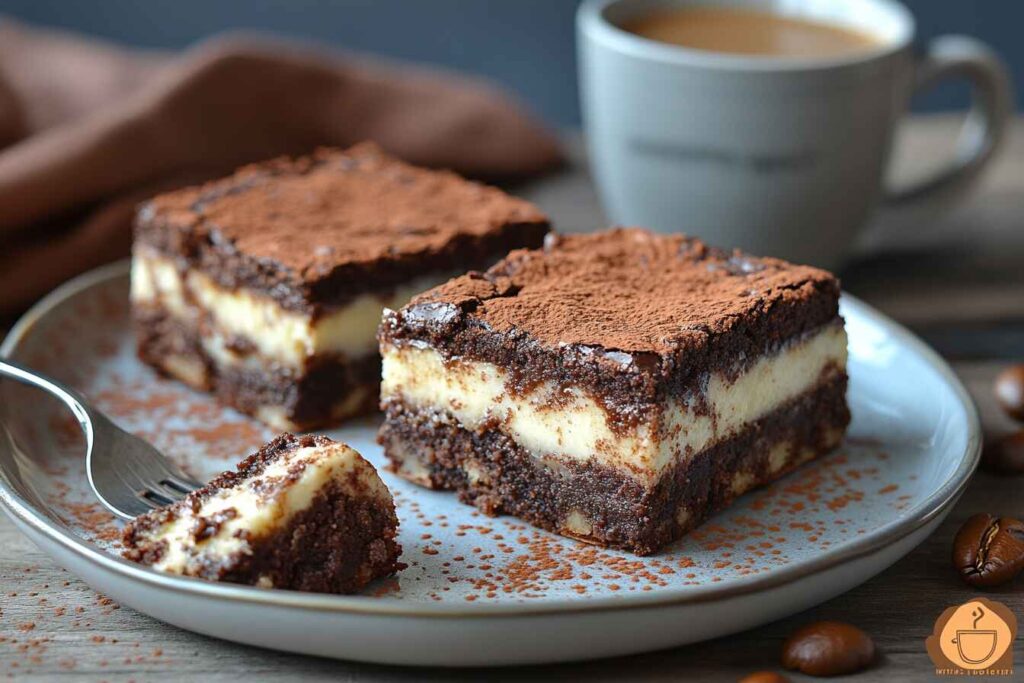
What if I told you that you could enjoy the rich, fudgy texture of a brownie and the creamy, coffee-kissed delight of tiramisu in a single bite? Sounds like dessert heaven, right? Well, welcome to the magical world of Tiramisu Brownies—a masterpiece that blends two iconic desserts into one show-stopping treat.
Whether you’re a chocoholic, a coffee lover, or just someone with a serious sweet tooth, this recipe will have you hooked. It’s perfect for family gatherings, parties, or simply indulging in a little self-care (because let’s be honest, we all deserve it!).
What Are Tiramisu Brownies? A Perfect Fusion of Two Classics
Think about it: traditional tiramisu, with its layers of espresso-soaked ladyfingers and mascarpone cream, meets the deep, chocolatey goodness of a homemade brownie. The result? A dessert that’s rich, creamy, slightly boozy (if you want it to be), and absolutely irresistible.
Why You’ll Love This Recipe
🍫 Rich and Fudgy Brownie Base
Forget dry brownies—this base is dense, chewy, and packed with deep cocoa flavor.
☕ Creamy, Coffee-Infused Tiramisu Layer
Silky mascarpone cheese mixed with espresso gives the top layer a dreamy, melt-in-your-mouth texture.
⚖️ Perfect Balance of Sweetness and Bitterness
The bold bitterness of espresso and cocoa balances out the sweetness, making it a sophisticated dessert that’s not overly sugary.
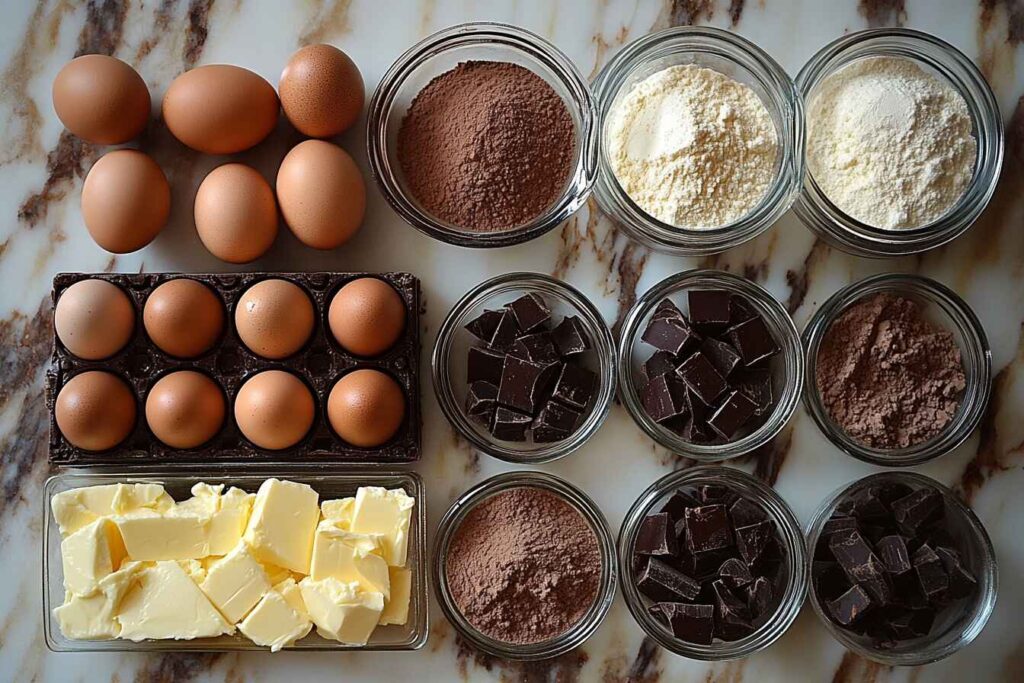
Ingredients You’ll Need
Before we get started, gather all your ingredients. Trust me, it makes baking way easier!
🍽️ Brownie Layer:
- 1 cup (225g) unsalted butter, melted
- 1 cup (200g) granulated sugar
- ½ cup (100g) brown sugar
- 3 large eggs
- 1 teaspoon vanilla extract
- ¾ cup (90g) all-purpose flour
- ½ cup (60g) unsweetened cocoa powder
- ½ teaspoon salt
- ½ teaspoon baking powder
- ½ cup (90g) dark chocolate, melted
☕ Tiramisu Layer:
- 8 oz (225g) mascarpone cheese
- ½ cup (120ml) heavy cream
- ¼ cup (50g) granulated sugar
- 1 large egg yolk
- 1 teaspoon vanilla extract
- 2 tablespoons espresso or strong brewed coffee
- 1 tablespoon cocoa powder (for dusting)
Step-by-Step Guide: How to Make Tiramisu Brownies
Now that we have all our ingredients, let’s dive into the process. Follow these steps, and you’ll have a batch of perfect Tiramisu Brownies ready in no time!
Step 1: Preparing the Brownie Base
First things first—let’s get that rich, chocolatey brownie base ready. Preheat your oven to 350°F (175°C) and grease an 8×8-inch baking pan or line it with parchment paper.
- Melt the butter and chocolate: In a heatproof bowl, melt the butter and dark chocolate together. You can do this in the microwave (30-second intervals) or over a double boiler.
- Whisk in the sugars: Add the granulated sugar and brown sugar to the melted mixture and whisk until smooth.
- Beat in the eggs and vanilla: One at a time, add the eggs, whisking well after each addition. Stir in the vanilla extract.
- Combine the dry ingredients: In a separate bowl, whisk together the flour, cocoa powder, salt, and baking powder.
- Mix wet and dry ingredients: Slowly fold the dry ingredients into the wet mixture, stirring just until combined.
- Pour and bake: Pour the batter into your prepared baking dish, smoothing out the top. Bake for 20-25 minutes or until a toothpick inserted in the center comes out with a few moist crumbs.
Pro Tip: Don’t overbake! The brownies should still be slightly gooey in the center because they will firm up as they cool.
Nutrition Facts (Per Serving)
Nutrient Amount Calories 280 kcal Carbohydrates 35g Protein 4g Fat 15g Sugar 22g Sodium 80mg
Step 2: Making the Creamy Mascarpone Layer
Now that our brownie base is cooling, it’s time to make the rich and creamy mascarpone layer that truly gives these brownies their tiramisu essence. The secret? A combination of mascarpone cheese, espresso, and just the right amount of sweetness.
What Makes This Tiramisu Layer Special?
- ☕ **Bold Coffee Flavor** – Espresso infuses the mascarpone with that classic tiramisu taste.
- 🎂 **Ultra-Creamy Texture** – The mascarpone and whipped cream create a silky-smooth layer.
- 🍰 **Perfect Balance of Sweetness** – Just enough sugar to complement the chocolate brownie without overpowering it.
Ingredients for the Tiramisu Layer
- 8 oz (225g) **mascarpone cheese**, softened
- ½ cup (120ml) **heavy whipping cream**
- ¼ cup (50g) **granulated sugar**
- 1 **large egg yolk**
- 1 teaspoon **vanilla extract**
- 2 tablespoons **strong brewed espresso** (or coffee)
- 1 tablespoon **unsweetened cocoa powder** (for dusting)
Step-by-Step Instructions
- Whip the heavy cream: In a bowl, beat the heavy cream with an electric mixer until soft peaks form. Set aside.
- Prepare the mascarpone mixture: In another bowl, whisk together the mascarpone cheese, sugar, egg yolk, vanilla extract, and espresso. Mix until smooth and creamy.
- Gently fold in the whipped cream: Using a spatula, carefully fold the whipped cream into the mascarpone mixture until well combined. Be gentle to maintain the airy texture!
Pro Tip: Don’t overmix! Overmixing will cause the mascarpone to become too runny, affecting the final texture of your tiramisu brownies.
Step 3: Assembling the Layers
Now comes the fun part—combining the rich brownie base with the velvety mascarpone topping! Here’s how:
- Ensure the brownies are completely cool. If they’re still warm, the mascarpone layer will melt and turn into a mess.
- Spread the tiramisu layer: Using a spatula, evenly spread the mascarpone mixture over the brownie layer.
- Dust with cocoa powder: Use a fine-mesh sieve to sprinkle a light layer of cocoa powder over the mascarpone.
- Chill the brownies: Refrigerate for at least 2 hours (preferably overnight) to let the flavors meld and the layers set properly.
Pro Tip: The longer these brownies chill, the better they taste! Overnight chilling enhances the flavors and texture.
Step 4: Baking (If You Prefer a Firmer Mascarpone Layer)
While traditional tiramisu isn’t baked, some people prefer a slightly firmer texture. If that’s you, bake the assembled brownies at **325°F (163°C) for 10 minutes** before chilling.
Common Problems & How to Fix Them
Even the best bakers run into issues! Here are some common tiramisu brownie problems and how to fix them:
Problem 1: The Brownies Turn Out Too Dry
Solution: Make sure you don’t overbake! Take them out of the oven when they’re still slightly gooey in the center. Also, using brown sugar in the batter helps keep them moist.
Problem 2: The Mascarpone Layer is Too Runny
Solution: Overmixing mascarpone can make it too loose. Be gentle when folding in the whipped cream. If it’s still too soft, chill the mixture for 15 minutes before spreading.
Problem 3: The Coffee Flavor is Too Weak
Solution: Use strong brewed espresso instead of regular coffee. You can also add 1 teaspoon of instant espresso powder for an extra kick.
Problem 4: The Layers Don’t Set Properly
Solution: Give the brownies enough chilling time! If you’re short on time, freeze them for 30 minutes instead of refrigerating.
Pro Tips for the Best Tiramisu Brownies
🍫 Use High-Quality Ingredients
Good-quality chocolate, fresh espresso, and authentic mascarpone make all the difference. Don’t skimp on these!
☕ Adjust the Coffee Intensity to Your Preference
If you love bold coffee flavor, add extra espresso. For a milder version, reduce the amount slightly.
❄️ Chill Before Serving for the Best Texture
Refrigeration enhances the flavors and allows the layers to set properly, giving you that perfect creamy bite.
Nutrition Facts (Per Serving)
Nutrient Amount Calories 340 kcal Carbohydrates 38g Protein 5g Fat 19g Sugar 24g Sodium 90mg
Creative Variations of Tiramisu Brownies
Want to take your Tiramisu Brownies to the next level? Here are some fun variations to customize this dessert based on your preferences.
🍸 Boozy Tiramisu Brownies (Adults Only!)
Love a little kick in your desserts? Add **1-2 tablespoons of Kahlúa, Baileys, or dark rum** to the mascarpone layer for a subtle boozy twist.
🌱 Gluten-Free Tiramisu Brownies
Substitute **almond flour or a gluten-free baking blend** for the all-purpose flour in the brownie layer. You won’t even miss the gluten!
🍫 White Chocolate Tiramisu Brownies
Swap the dark chocolate in the brownie batter for **white chocolate** and reduce the cocoa powder by half for a milder, creamier version.
☕ Extra Coffee-Infused Brownies
Mix **1 teaspoon of instant espresso powder** into the brownie batter for even more coffee flavor throughout.
🍓 Fruity Twist: Raspberry Tiramisu Brownies
Add a layer of **fresh raspberries or raspberry jam** between the brownie and mascarpone layers for a sweet, tangy contrast.
Best Ways to Store Tiramisu Brownies
Proper storage ensures your brownies stay fresh and delicious for as long as possible.
📦 How to Store in the Fridge
- Place the brownies in an **airtight container**.
- Store in the **refrigerator for up to 5 days**.
- Let them sit at room temperature for **10-15 minutes** before serving for the best texture.
❄️ Can You Freeze Tiramisu Brownies?
- Yes! Wrap each brownie individually in plastic wrap.
- Place them in a **freezer-safe container or zip-top bag**.
- Store in the freezer for **up to 2 months**.
- Thaw overnight in the fridge before serving.
How to Serve Tiramisu Brownies
Serving these brownies the right way makes them even more irresistible!
☕ Best Drinks to Pair With Tiramisu Brownies
- Espresso or cappuccino for the ultimate coffee experience.
- A glass of milk to balance the richness.
- Baileys or Kahlúa for a boozy treat.
🍨 Fun Serving Ideas
- Serve warm with **vanilla or coffee ice cream**.
- Drizzle with **melted chocolate or caramel sauce**.
- Top with **whipped cream and chocolate shavings**.
Frequently Asked Questions (FAQs)
Q1: Can I use cream cheese instead of mascarpone?
A: Yes! While mascarpone gives an authentic tiramisu flavor, **cream cheese** can be used as a substitute. Just add **1-2 tablespoons of heavy cream** to make it smoother.
Q2: Can I make these brownies without coffee?
A: Absolutely! Skip the espresso and replace it with **milk or vanilla extract** for a coffee-free version.
Q3: What’s the best cocoa powder to use?
A: Dutch-processed cocoa powder gives a richer, smoother taste, while natural cocoa powder adds more acidity and a slightly bitter edge. Both work well!
Q4: Can I make this recipe ahead of time?
A: Yes! In fact, these brownies taste even better the next day after the flavors have fully developed. Simply store them in the fridge until you’re ready to serve.
Q5: How do I cut Tiramisu Brownies cleanly?
A: Use a sharp knife and **wipe it clean between cuts** to get smooth, perfect slices.
Final Thoughts: Why Tiramisu Brownies Are Worth the Hype
So, are Tiramisu Brownies worth making? Absolutely! They’re the perfect combination of **rich chocolate, creamy mascarpone, and bold coffee flavors**, all in one indulgent bite.
These brownies are great for:
- 💡 Impressing guests at a party.
- 🍪 Satisfying chocolate and coffee cravings.
- 🎂 Celebrating special occasions.
Now that you have this **step-by-step guide**, it’s time to roll up your sleeves and bake! Try out the recipe, experiment with variations, and enjoy every delicious bite.
Happy baking! 🍫☕