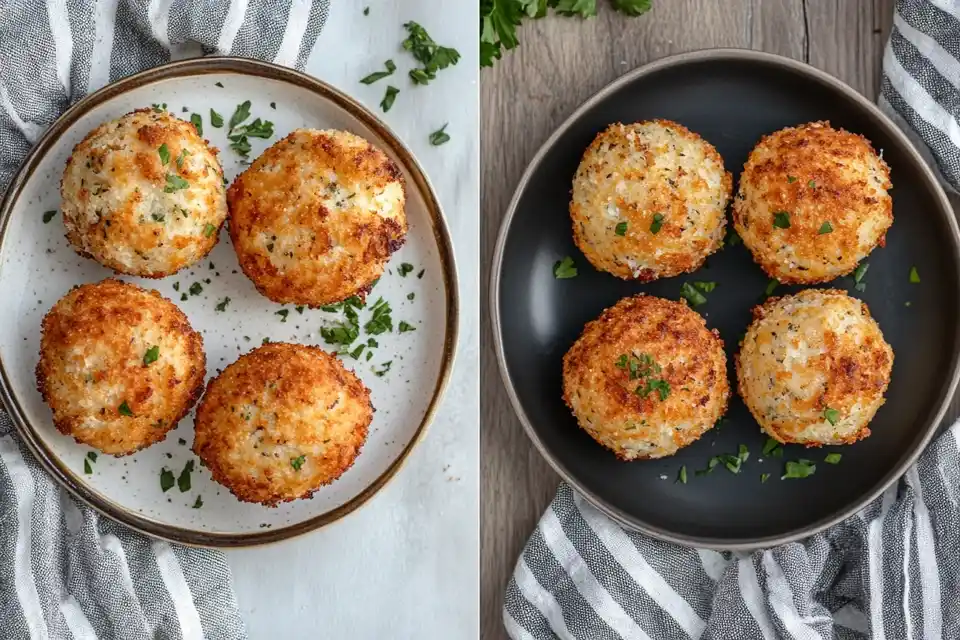
Craving a bite-sized, crispy, cheesy, and flavor-loaded burger? Say hello to Garlic Parmesan Cheeseburger Bombs – a golden, buttery, garlicky shell stuffed with juicy beef, gooey cheese, and bold flavors! 🍔🧄🧀 These little flavor explosions are perfect for parties, family dinners, or even a late-night snack.
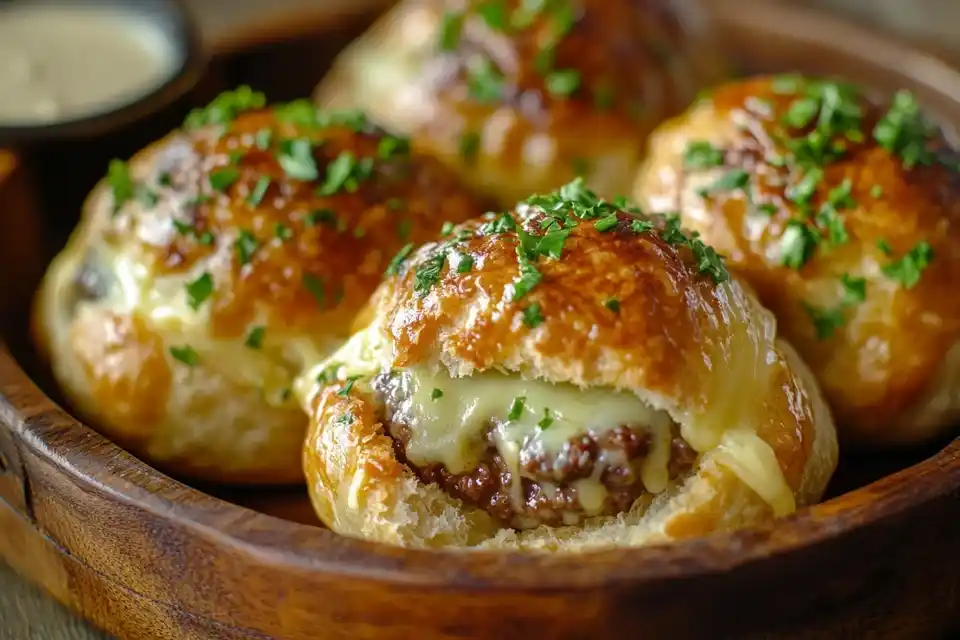
Imagine biting into a soft, warm dough pocket that oozes melted cheese and seasoned beef with every bite. Sounds dreamy, right? 🤤 If you’re a fan of burgers, cheese, and all things garlicky, then this recipe is your new best friend!
“Why settle for an ordinary cheeseburger when you can have it wrapped in a buttery, garlicky crust with a Parmesan kick?”
What Are Garlic Parmesan Cheeseburger Bombs?
So, what exactly are these little bites of heaven? Simply put, they’re mini cheeseburgers wrapped in dough, brushed with a savory garlic butter sauce, and baked until golden brown. Think of them as the lovechild of a juicy cheeseburger and a garlic knot! ❤️
The Origin and Popularity of Cheeseburger Bombs
Cheeseburger bombs have taken the food world by storm! They first became popular as an easy-to-make party appetizer, but their insane flavor has turned them into a must-try meal. They combine all the elements of a classic burger but in a more convenient, handheld form.
Why Add Garlic and Parmesan for an Irresistible Twist?
We all love a good cheeseburger, but adding garlic and Parmesan makes it downright addictive! The garlic butter soaks into the dough, creating a rich and savory flavor, while Parmesan adds that nutty, salty depth that balances the cheesiness. It’s a match made in food heaven! 🔥
Ingredients Needed for Garlic Parmesan Cheeseburger Bombs
Before we dive into making these beauties, let’s gather everything we need. Here’s a quick list of ingredients:
| Ingredient | Quantity |
|---|---|
| Ground beef (80/20 blend for juiciness) | 1 lb (450g) |
| Salt | 1 tsp |
| Black pepper | 1/2 tsp |
| Garlic powder | 1 tsp |
| Onion powder | 1 tsp |
| Worcestershire sauce | 1 tbsp |
| Shredded cheddar cheese | 1 cup |
| Pizza dough or biscuit dough | 1 package |
| Butter (melted) | 1/4 cup |
| Fresh garlic (minced) | 3 cloves |
| Grated Parmesan cheese | 1/2 cup |
| Parsley (chopped, for garnish) | 2 tbsp |
The Best Type of Ground Beef for Juicy Bombs
The key to a super juicy cheeseburger bomb is using 80/20 ground beef (80% lean meat, 20% fat). The fat content keeps the filling moist and flavorful while preventing dryness.
Choosing the Right Cheese for Maximum Flavor
Cheddar is the go-to cheese for these bombs, but feel free to mix it up with mozzarella, pepper jack, or even smoked gouda. The gooier, the better! 🧀
Why Fresh Garlic and Parmesan Make a Difference
Freshly minced garlic is way more flavorful than garlic powder. When combined with melted butter and Parmesan, it creates a crispy, garlicky topping that makes these cheeseburger bombs extra special.
The Perfect Dough: Store-Bought vs. Homemade
For a quick recipe, store-bought pizza dough or biscuit dough works great. But if you have time, homemade dough will take your cheeseburger bombs to the next level! (More on that in the next section!)
Step-by-Step Recipe for Garlic Parmesan Cheeseburger Bombs
Now, let’s get to the fun part—cooking! Follow these simple steps to create the ultimate cheeseburger bombs:
Step 1: Preparing the Ground Beef Mixture
- In a large skillet, cook the ground beef over medium heat until browned.
- Drain excess fat and add salt, black pepper, garlic powder, onion powder, and Worcestershire sauce.
- Stir in the shredded cheddar cheese and remove from heat.
- Let the mixture cool slightly before assembling the bombs.
Step 2: Assembling the Cheeseburger Bombs
- Preheat your oven to 375°F (190°C).
- Roll out your dough and cut it into even squares.
- Place a spoonful of the beef mixture onto each square.
- Wrap the dough around the filling and pinch the edges to seal.
- Place the bombs seam-side down on a baking sheet.
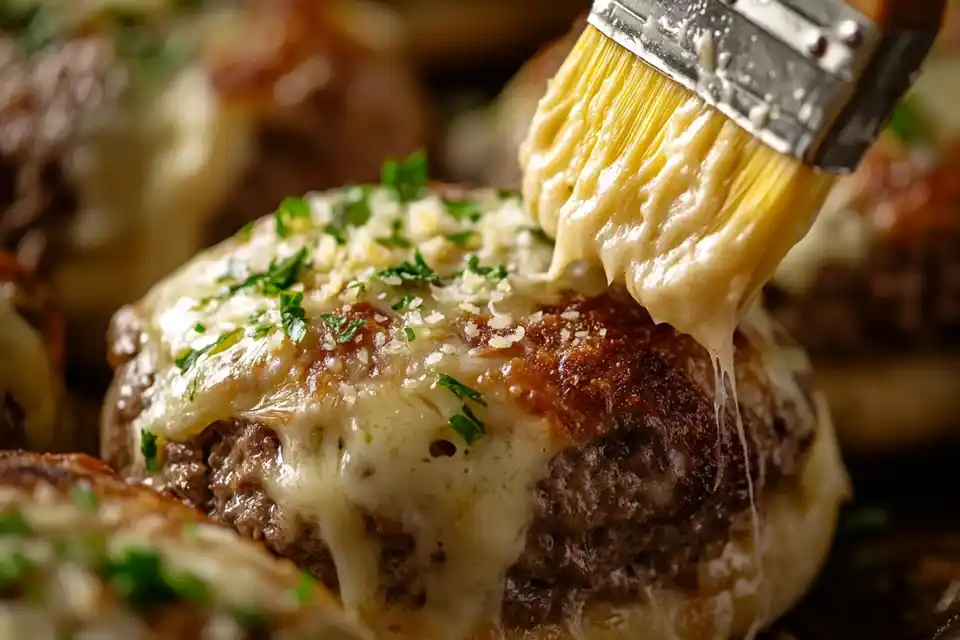
Step 3: Brushing with Garlic Butter and Baking to Perfection
- In a small bowl, mix melted butter, minced garlic, and Parmesan cheese.
- Brush the garlic butter over each cheeseburger bomb.
- Bake for 15-20 minutes or until golden brown.
- Garnish with chopped parsley and serve hot!
Common Problems and Solutions When Making Cheeseburger Bombs
Even the best cooks face challenges in the kitchen. If you’ve ever made cheeseburger bombs and they didn’t turn out as expected, don’t worry! Below are some common problems and how to fix them. 🚀
Why Are My Cheeseburger Bombs Falling Apart?
If your cheeseburger bombs are coming apart while baking, the most likely culprit is not sealing the dough properly. Here’s how to avoid this:
- Make sure you pinch and twist the dough edges tightly.
- If the dough is too dry, lightly wet your fingers before sealing.
- Place the bombs seam-side down on the baking sheet.
How to Prevent a Soggy or Undercooked Center
No one likes a doughy, raw center. If your cheeseburger bombs are undercooked, try these tips:
- Preheat the oven properly to ensure even cooking.
- Use a lightly greased baking sheet for better airflow.
- Don’t overfill the bombs! Too much beef or cheese can prevent even baking.
Fixing Overly Dry or Bland Filling
Dry cheeseburger bombs are a letdown. 😞 If your filling lacks juiciness, here’s what to do:
- Add a splash of Worcestershire sauce or a small amount of butter to the beef.
- Use 80/20 ground beef for a naturally juicy filling.
- Mix in diced onions or a little bit of mayo for extra moisture.
Tips for Making the Best Garlic Parmesan Cheeseburger Bombs
Now that we’ve covered the common issues, let’s move on to some pro tips to make your cheeseburger bombs **absolutely amazing**! 🚀
The Secret to a Perfectly Crispy, Buttery Crust
If you want an extra crispy and golden crust, follow these steps:
- Brush the bombs with melted butter TWICE – once before baking and once right after they come out.
- Use **Parmesan cheese and garlic** in the butter mixture for that crispy, flavorful crust.
- Bake on a wire rack over a baking sheet for even airflow and crispiness.
How to Achieve the Ideal Cheese Stretch Effect
Want that dreamy, Instagram-worthy **cheese pull**? Here’s how:
- Use **high-moisture cheese** like mozzarella or Monterey Jack.
- Chill the cheese slightly before assembling – it helps prevent it from melting too quickly.
- Serve immediately while the cheese is still gooey and melty! 🧀🔥
Adding Extra Flavor Variations and Fillings
Want to experiment? Here are some fun flavor twists to try:
- **Bacon Lover’s Bombs** – Add crispy bacon bits to the filling.
- **Spicy Kick Bombs** – Mix in diced jalapeños or hot sauce.
- **BBQ Cheeseburger Bombs** – Swap Worcestershire sauce for BBQ sauce.
- **Pizza Bombs** – Add marinara sauce and pepperoni for a pizza-style twist.
Air Fryer vs. Oven-Baked Garlic Parmesan Cheeseburger Bombs
Not sure whether to bake or air fry? Let’s compare both methods! 📢
Air Fryer Method: Faster and Crispier Results
Using an air fryer gives you **crispy cheeseburger bombs in less time**. Here’s how:
- Preheat the air fryer to **375°F (190°C)**.
- Place the bombs in a **single layer** (don’t overcrowd!).
- Cook for **8-10 minutes**, flipping halfway through.
⭐ **Pros**: Super crispy, faster cooking time, great for small batches.
❌ **Cons**: Limited space, might need multiple batches.
Oven-Baked Method: Best for Larger Batches
Oven baking is perfect if you’re making cheeseburger bombs for a crowd. Here’s how:
- Preheat oven to **375°F (190°C)**.
- Place bombs on a **parchment-lined baking sheet**.
- Bake for **15-20 minutes**, or until golden brown.
⭐ **Pros**: Great for large quantities, even cooking.
❌ **Cons**: Slightly longer cooking time, not as crispy as air-fried.

The Best Dipping Sauces for Garlic Parmesan Cheeseburger Bombs
Let’s be real – **everything is better with a good dip!** Here are some must-try sauces:
| Dip Name | Flavor Profile |
|---|---|
| Classic Ketchup & Mustard | Sweet, tangy, and nostalgic. |
| Garlic Aioli | Creamy, garlicky, and luxurious. |
| Spicy Sriracha Mayo | Smoky, spicy, and creamy. |
| BBQ Sauce | Sweet and smoky with a tangy kick. |
| Ranch Dressing | Cool, creamy, and herby. |
Feeling adventurous? Try **mixing dips together** for a custom flavor bomb!
How to Store and Reheat Cheeseburger Bombs
Got leftovers? No problem! Here’s how to **store and reheat them like a pro**:
Best Practices for Refrigeration and Freezing
- Store leftovers in an **airtight container** in the fridge for up to **3 days**.
- To freeze, wrap each bomb in plastic wrap and store in a **ziplock bag** for up to **2 months**.
Reheating for a Crispy and Fresh Texture
- **Oven Method**: Bake at 350°F (175°C) for **10 minutes**.
- **Air Fryer Method**: Air fry at 350°F (175°C) for **5-7 minutes**.
- **Microwave (Least Recommended)**: Heat for **30-40 seconds** (loses crispiness).
🔥 **Pro Tip:** Brush with a little garlic butter before reheating to **refresh the flavor!**
We’re almost at the finish line! In the final part of this article, we’ll discuss **what to serve with cheeseburger bombs** and wrap up with some final thoughts. Stay tuned!
Pairing Ideas: What to Serve with Garlic Parmesan Cheeseburger Bombs
Now that you’ve mastered the art of making **Garlic Parmesan Cheeseburger Bombs**, it’s time to think about what to serve alongside them! These golden, cheesy bites are delicious on their own, but pairing them with the right side dishes and drinks can take your meal to the next level. 🍽️
Side Dishes That Complement the Flavor
Here are some amazing side dish ideas that go perfectly with cheeseburger bombs:
| Side Dish | Description |
|---|---|
| Crispy French Fries | Classic choice! Thin, crispy fries pair perfectly with the juicy filling. |
| Loaded Tater Tots | Top with cheese, bacon, and sour cream for an extra indulgent side. |
| Garlic Butter Roasted Vegetables | Balance out the richness with a healthy roasted veggie medley. |
| Caesar Salad | A fresh, tangy salad helps cut through the cheesy goodness. |
| Mac and Cheese | Double down on cheesy comfort food with a creamy mac and cheese. |
Drinks That Enhance the Cheeseburger Bomb Experience
Pairing the right drink with your cheeseburger bombs can elevate the flavors even more! Here are some great options:
- 🥤 **Classic Soda** – A cold cola or root beer is always a winner.
- 🍹 **Homemade Lemonade** – The tangy sweetness balances the richness.
- 🍺 **Craft Beer** – A crisp lager or pale ale complements the garlicky, cheesy flavors.
- 🥛 **Milkshake** – Go full diner-style with a thick chocolate or vanilla shake!
- 🍷 **Red Wine** – If you’re feeling fancy, a light red like Pinot Noir pairs beautifully.
Final Thoughts: Why You Should Try Garlic Parmesan Cheeseburger Bombs Today
We’ve covered everything you need to know about **Garlic Parmesan Cheeseburger Bombs**, from ingredients and preparation to troubleshooting and pairing ideas. If you haven’t already made them, **what are you waiting for?!** 🚀
Why This Recipe is a Must-Try
- ✅ **Easy to Make** – Simple ingredients, minimal prep, and ready in under 30 minutes!
- ✅ **Flavor Explosion** – Juicy beef, gooey cheese, buttery garlic, and crispy Parmesan crust.
- ✅ **Perfect for Any Occasion** – Great for parties, snacks, family dinners, or meal prepping.
- ✅ **Kid-Friendly & Crowd-Pleasing** – Everyone loves a good cheesy bite-sized burger.
Your Next Steps
Now that you have the recipe and all the tips, it’s time to put it to the test! Here’s what to do next:
- Gather your ingredients and get ready to cook. 🛒
- Follow the step-by-step recipe and don’t forget the **garlic butter glaze**. 🧄🧈
- Snap a picture of your cheeseburger bombs and share them with friends! 📸
- Enjoy every cheesy, garlicky bite! 🤤
“Homemade food is the best kind of food – and nothing beats the taste of fresh, warm cheeseburger bombs straight from your oven!” 🍔🔥
Nutrition Facts: How Healthy Are Cheeseburger Bombs?
If you’re wondering about the nutrition breakdown, here’s an estimated look at the nutritional value per serving (based on 2 cheeseburger bombs per serving):
| Nutrient | Amount |
|---|---|
| Calories | 320 kcal |
| Protein | 18g |
| Carbohydrates | 28g |
| Fats | 16g |
| Saturated Fats | 7g |
| Fiber | 2g |
| Sodium | 540mg |
**Healthier Tips:** Want to make these a little lighter? Try using **ground turkey instead of beef**, **whole wheat dough instead of regular**, and **reduced-fat cheese** to cut down on calories and fat.
Frequently Asked Questions (FAQ)
Still have some questions? Let’s clear up some common ones!
Can I Make Cheeseburger Bombs in Advance?
Yes! You can assemble them ahead of time and store them **uncooked in the fridge for up to 24 hours** before baking. You can also freeze them for longer storage.
How Do I Make These Cheeseburger Bombs Keto-Friendly?
Want to keep it low-carb? Swap the regular dough for **fathead dough (almond flour-based)** or use **large mushrooms** as a natural “bun” alternative.
Can I Use Pre-Made Burger Patties?
Technically, yes! Just chop them up into small pieces and mix with cheese before stuffing into the dough.
Are These Good for Meal Prepping?
Absolutely! These cheeseburger bombs reheat beautifully, making them great for **quick lunches or grab-and-go dinners.**
Final Words: Time to Make Your Own Garlic Parmesan Cheeseburger Bombs! 🚀
By now, you’re fully equipped with all the **tips, tricks, and knowledge** to make the best **Garlic Parmesan Cheeseburger Bombs** at home. Whether you’re making them for yourself, your family, or a party, these cheesy bites are guaranteed to be a hit. 🎉
🔥 So what are you waiting for? Head to the kitchen, start cooking, and enjoy every delicious, cheesy, garlicky bite! 🔥
And don’t forget to share your creations! If you try this recipe, snap a photo and tag us on social media. We’d love to see your delicious results! 🍔❤️