Indulge Your Cravings: The Ultimate Homemade Chocolate Peanut Butter Cups
Craving that perfect balance of rich chocolate and creamy peanut butter? Ever wondered if you could replicate the magic of a Reese’s Peanut Butter Cups in your own kitchen? Absolutely! Crafting homemade Chocolate Peanut Butter Cups is not only incredibly satisfying but also allows you to control the quality of ingredients, customize flavors, and avoid artificial additives. This blog post will guide you through creating these delectable treats from scratch, ensuring a sensational experience for your taste buds. Get ready to impress your friends and family with a dessert that rivals any store-bought confection!
Ingredients & Kitchen Tools
- 1 ½ cups peanut butter (creamy or crunchy): The star of our show! Use your favorite brand. Natural peanut butter works well but may require a bit more chilling time.
- ½ cup unsalted butter, softened: Adds richness and helps bind the peanut butter filling.
- 1 ½ cups powdered sugar (confectioners’ sugar): Sweetens the filling and gives it that smooth, melt-in-your-mouth texture.
- 1 teaspoon vanilla extract: Enhances the overall flavor profile.
- 12 ounces semi-sweet chocolate chips (or dark chocolate for a richer flavor): The chocolate coating. High-quality chocolate makes a big difference!
- 2 tablespoons coconut oil (optional but recommended): Helps thin the melted chocolate, making it easier to coat and giving it a beautiful sheen.
- Muffin tin: Standard 12-cup muffin tin.
- Paper cupcake liners: Prevents sticking and makes for easy handling.
- Mixing bowls: For combining ingredients.
- Whisk or electric mixer: For achieving a smooth peanut butter filling.
- Microwave-safe bowl or double boiler: For melting chocolate.
- Spoon or small scoop: For portioning the filling and chocolate.
Prep Time & Cooking Schedule
- Prep Time: 20 minutes
- Chill Time (Peanut Butter Filling): 30 minutes
- Chill Time (After Dipping): 1 hour
- Total Time: Approximately 1 hour 50 minutes
This recipe is designed for relatively quick preparation, with the bulk of the time spent chilling to ensure the perfect consistency. You can prepare the peanut butter filling ahead of time and store it in the refrigerator for up to 3 days, making assembly even faster when you’re ready to coat them in chocolate.
Step-by-Step Instructions
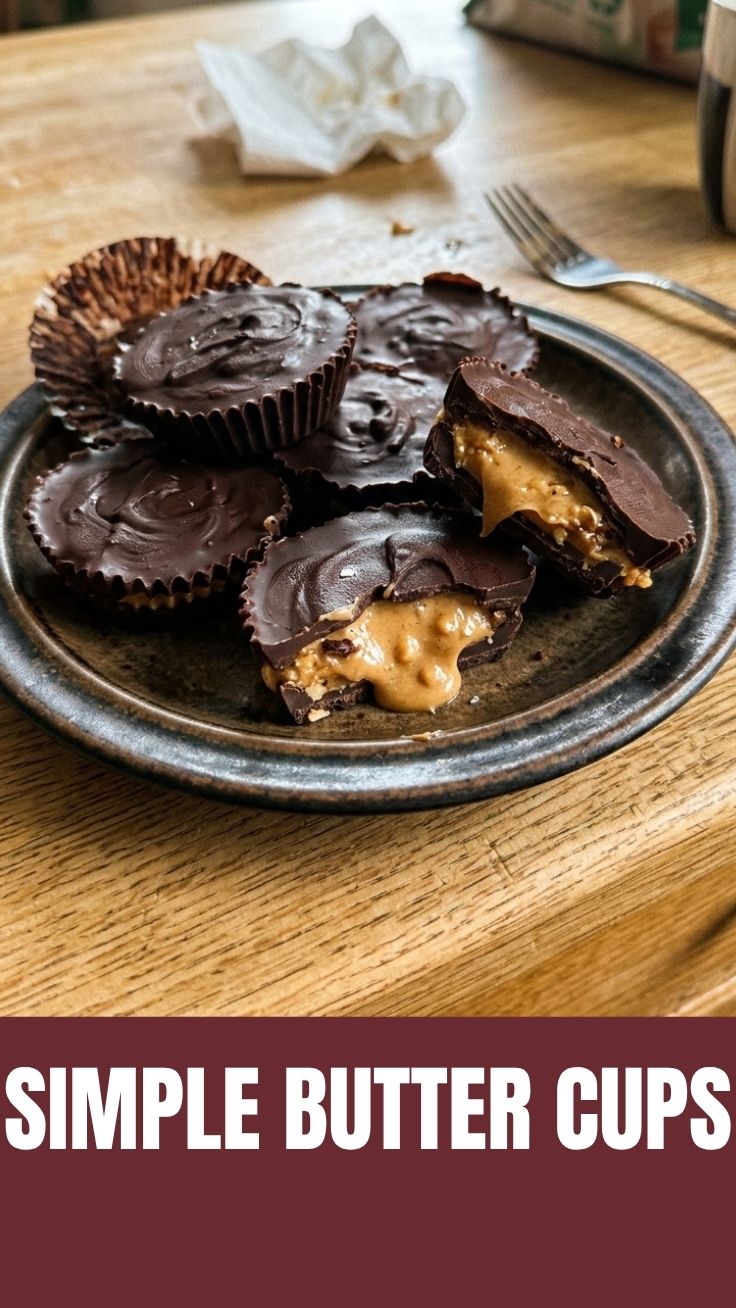
1. Prepare the Peanut Butter Filling: In a medium mixing bowl, combine the softened butter and peanut butter. Beat with a whisk or electric mixer until smooth and creamy. Gradually add the powdered sugar and vanilla extract, mixing until fully incorporated and the mixture reaches a dough-like consistency. This is your core for the delightful Chocolate Peanut Butter Cups.
2. Form the Peanut Butter Discs: Line a muffin tin with paper cupcake liners. Take small portions of the peanut butter mixture (about 1 tablespoon each) and roll them into balls. Press each ball into the bottom of a cupcake liner, flattening it slightly to form a disc. Ensure they are relatively uniform in thickness for even chilling and a consistent bite, just like a classic Reese’s Peanut Butter Cups interior.
3. Chill the Peanut Butter Discs: Place the muffin tin in the refrigerator for at least 30 minutes. This will firm up the peanut butter discs, making them easier to handle and preventing them from melting prematurely when coated with warm chocolate.
4. Melt the Chocolate Coating: In a microwave-safe bowl, combine the chocolate chips and coconut oil (if using). Microwave in 30-second intervals, stirring well after each, until the chocolate is completely melted and smooth. Alternatively, use a double boiler for gentle melting.
5. Assemble the Cups: Remove the chilled peanut butter discs from the refrigerator. Spoon about 1-2 teaspoons of melted chocolate over each peanut butter disc, focusing on covering the top and sides completely. You can also carefully lift each disc and dip it into the chocolate, ensuring full coverage, then return it to the liner.
6. Chill to Set: Once all the cups are coated, return the muffin tin to the refrigerator for at least 1 hour, or until the chocolate is fully set and firm.
7. Enjoy! Once chilled, carefully remove the paper liners and enjoy your homemade creations.
Nutritional Benefits & Advantages
These delectable treats, while undeniably indulgent, offer a few surprising benefits when made at home. Peanut butter is a good source of protein, healthy fats, and essential minerals like magnesium and potassium. Dark chocolate, if chosen, is packed with antioxidants. By preparing your own Chocolate Peanut Butter Cups, you control sugar levels and avoid hydrogenated oils and artificial flavors often found in commercial versions. This offers a more wholesome twist on a classic candy.
Tips Variations & Cooking Advice
- Nut Butter Swap: While peanut butter is traditional, feel free to experiment with almond butter or cashew butter for different flavor profiles.
- Chocolate Choice: Adjust the chocolate to your preference – milk chocolate for a sweeter cup, or extra dark for a more intense, less sweet treat.
- Add-ins: Stir in a pinch of sea salt to the peanut butter filling to enhance the chocolate flavor, or mix in mini chocolate chips or finely chopped nuts for added texture.
- Coconut Oil Alternative: If you don’t have coconut oil, a teaspoon of shortening can also help thin the chocolate and provide a glossy finish.
- Mini Cups: Use a mini muffin tin for bite-sized versions, perfect for parties or portion control.
Common Mistakes to Avoid
- Not chilling the peanut butter sufficiently: This is crucial. If the peanut butter discs aren’t firm, they’ll be difficult to handle and may melt into the warm chocolate.
- Overheating the chocolate: Melt chocolate slowly and gently. Overheated chocolate can seize up, become grainy, and lose its smooth texture.
- Using too much chocolate: While tempting, too thick a chocolate layer can overpower the peanut butter. Aim for a balanced ratio.
- Not using paper liners: These are key for easy removal and prevent sticking to the muffin tin.
Storage & Meal Prep Tips
Store your homemade Chocolate Peanut Butter Cups in an airtight container in the refrigerator for up to 2 weeks. They can also be frozen for up to 3 months. If freezing, separate layers with parchment paper to prevent sticking. Thaw in the refrigerator or at room temperature for a few minutes before enjoying for optimal texture.
Conclusion
There’s nothing quite like the satisfaction of biting into a homemade Chocolate Peanut Butter Cups, especially when you’ve crafted it with your own hands. This recipe delivers that iconic flavor and texture, closely mimicking the beloved Reese’s Peanut Butter Cups, but with the added joy of knowing exactly what went into it. We encourage you to whip up a batch, share the deliciousness, and savor every moment of this incredible treat. Happy baking!
FAQs
1. Can I use natural peanut butter?
Yes, natural peanut butter can be used, but ensure it’s well-stirred. You might find the filling a bit softer and it may require longer chilling times.
2. What if my chocolate seizes up while melting?
Seized chocolate is often a result of water getting into it or overheating. Try adding a teaspoon of vegetable oil or shortening and stirring vigorously to rescue it.
3. Can I make these dairy-free?
Absolutely! Use a dairy-free butter alternative and dairy-free chocolate chips to make this recipe completely dairy-free.
4. How can I make the chocolate coating extra glossy?
Adding a small amount of coconut oil or shortening to your melting chocolate helps achieve that beautiful, professional-looking gloss.