Ditch the Restaurant, Embrace the Flavor: Your Guide to an Unforgettable Homemade Shrimp Boil!
Ever wonder how to bring that vibrant, finger-licking deliciousness of a classic seafood boil right into your own kitchen? The good news is, you don’t need a coastline view or a sky-high restaurant bill to enjoy a truly spectacular Shrimp Boil (without sausage). Preparing this beloved dish at home is not only incredibly rewarding but also allows you to control the quality of your ingredients and tailor the flavors precisely to your liking. Imagine the aroma filling your home, the anticipation building, and that satisfying moment when you pour out a steaming mound of perfectly cooked seafood and vegetables. This guide will walk you through crafting a sensational homemade Low Country Shrimp Boil, transforming your dining table into a culinary celebration.
Ingredients & Kitchen Tools
Gathering your provisions and equipment is the first step to a successful shrimp boil. Quality ingredients make all the difference!
Ingredients:
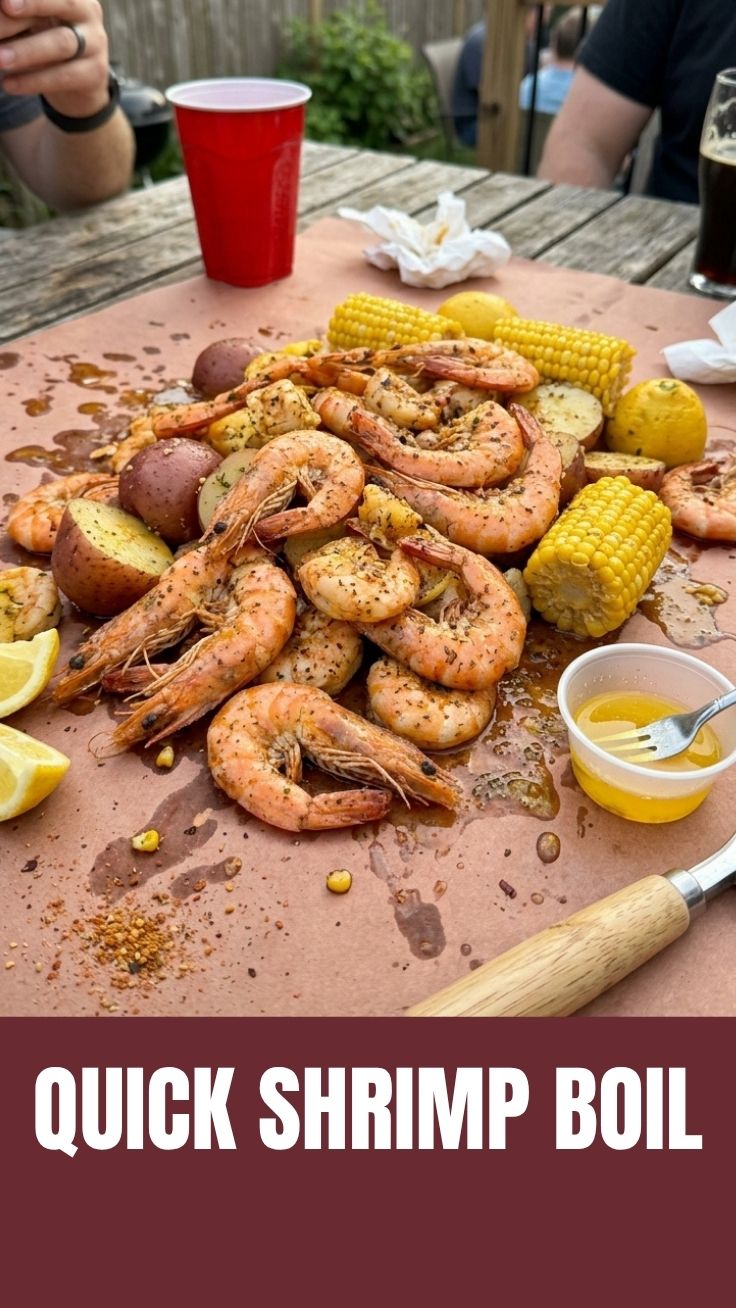
- 2 lbs Large Raw Shrimp (21-25 count), peeled and deveined, tails on or off: Freshness is key. Look for bright, firm shrimp.
- 6 ears Corn on the Cob, husked and cut into 2-inch pieces: Sweet corn complements the seafood beautifully.
- 2 lbs Small Red Potatoes, scrubbed: These hold their shape well and soak up the flavorful broth.
1 lb Smoked Sausage (Andouille or Kielbasa), sliced into 1-inch rounds: Adds a smoky, savory depth. (Optional, for a classic boil, though our focus today is on the pure shrimp experience!)*
- 1 Large Yellow Onion, quartered: Contributes a sweet, aromatic base.
- 6 cloves Garlic, smashed: Essential for that pungent, savory kick.
- 1/2 cup Old Bay Seasoning (or seafood boil seasoning of choice): The iconic flavor of a seafood boil. Adjust to your spice preference.
- 1/4 cup Lemon Juice, freshly squeezed: Brightens the flavors and adds a zesty finish.
- 4 Lemons, halved, for serving: Perfect for squeezing over the finished boil.
- 1 stick Unsalted Butter, melted, for serving: A rich, delicious accompaniment.
- Optional garnish: Fresh parsley or cilantro, chopped.
Kitchen Tools:
- Large Stockpot (at least 12-quart capacity) with lid: Essential for accommodating all the ingredients and liquid.
- Fine-mesh strainer or spider skimmer: For easily removing cooked ingredients from the pot.
- Large serving platter or newspaper-lined table: For the traditional pour-out presentation.
- Measuring cups and spoons: For precise ingredient portions.
- Sharp knife and cutting board: For prep work.
Prep Time & Cooking Schedule
Getting organized before you cook ensures a smooth and enjoyable experience.

- Prep Time: 20 minutes (for chopping vegetables, peeling shrimp, etc.)
- Cook Time: 25-30 minutes
- Resting Time: 5 minutes (allowing flavors to meld slightly)
Plan to start your boil about an hour before you intend to serve. The active cooking time is relatively short, making it a fantastic option for weeknight dinners or casual gatherings.
Step-by-Step Instructions
Let’s dive into making your homemade Shrimp Boil (without sausage) a resounding success!
1. Prepare the Boiling Liquid: Fill your large stockpot with enough water to comfortably cover all the ingredients (about 8-10 quarts). Add the Old Bay seasoning, quartered onion, smashed garlic, and a generous pinch of salt. Bring the mixture to a rolling boil over high heat. This aromatic liquid is the heart of your Low Country Shrimp Boil.
2. Add Potatoes: Once the water is boiling, carefully add the scrubbed red potatoes. Reduce the heat slightly to maintain a vigorous simmer. Cook for about 10-12 minutes, or until the potatoes are just tender when pierced with a fork.
3. Add Corn: Next, add the corn on the cob pieces to the pot. Continue to simmer for another 5-7 minutes, until the corn is bright yellow and tender-crisp.
4. Add Shrimp: Finally, add the peeled and deveined shrimp to the pot. Cook for only 2-3 minutes, or until the shrimp turn opaque and pink and begin to curl. Overcooking shrimp will make them tough, so watch them closely!
5. Drain and Serve: Immediately remove the pot from the heat. Using your fine-mesh strainer or spider skimmer, carefully transfer all the cooked ingredients (potatoes, corn, shrimp) to a large serving platter or directly onto a newspaper-lined table for a traditional communal experience. Drizzle with fresh lemon juice, melted butter, and garnish with fresh herbs if desired.
Nutritional Benefits & Advantages
Beyond its incredible taste, a homemade shrimp boil offers several nutritional advantages. Shrimp is a lean protein source, rich in essential nutrients like selenium, vitamin B12, and phosphorus. It’s also low in calories and saturated fat. The corn provides dietary fiber and antioxidants, while potatoes offer complex carbohydrates for sustained energy. By preparing it at home, you can control sodium levels and avoid any unwanted additives often found in commercially prepared versions.
Tips, Variations & Cooking Advice
- Spice Level: Adjust the amount of Old Bay seasoning to your preference. For an extra kick, add a few dashes of cayenne pepper or sliced jalapeños to the boiling liquid.
- Vegetable Additions: Consider adding other quick-cooking vegetables like button mushrooms, asparagus, or halved bell peppers during the last 5 minutes of cooking.
- Flavor Boost: For an even deeper flavor, you can add a bottle of light beer to the boiling liquid along with the water and seasonings.
- Seafood Medley: While our focus is on shrimp, you could easily add clams or mussels during the last 5-7 minutes of cooking for a more varied seafood experience.
Common Mistakes to Avoid
- Overcooking the Shrimp: This is the most common mistake! Shrimp cooks very quickly. As soon as they turn pink and opaque, they’re done. Tough, rubbery shrimp diminish the experience.
- Not Enough Seasoning: A bland boil is a sad boil. Don’t be shy with the Old Bay or your chosen seafood seasoning.
- Crowding the Pot: If your stockpot is too small, the water temperature will drop too much, leading to uneven cooking. If necessary, cook in batches.
Storage & Meal Prep Tips
Leftover shrimp boil can be delicious! Store any remaining shrimp, corn, and potatoes in an airtight container in the refrigerator for up to 2-3 days. Reheat gently in the microwave or a pan with a splash of broth to prevent drying out. The flavors tend to meld even further overnight. Freezing cooked shrimp is generally not recommended as it can negatively impact the texture.
Conclusion
There you have it – a comprehensive guide to mastering the art of the homemade Low Country Shrimp Boil. By following these steps, you’re not just cooking a meal; you’re creating an experience, a memory, and a feast that celebrates the simple yet profound joy of fresh ingredients. So, gather your loved ones, roll up your sleeves, and prepare to delight in the incredible flavors of this Shrimp Boil (without sausage). We encourage you to try this recipe and share your culinary adventure with us! What are your favorite additions to a shrimp boil? Let us know in the comments below!
FAQs
Q: Can I use frozen shrimp for this recipe?
A: Yes, you can. Thaw the shrimp completely before adding them to the pot to ensure even cooking.
Q: What can I serve with a shrimp boil?
A: Crusty bread is perfect for soaking up the flavorful juices. A simple green salad or coleslaw can also provide a refreshing counterpoint.
Q: Can I make this boil less spicy?
A: Absolutely. Reduce the amount of Old Bay seasoning or opt for a mild seafood seasoning blend.
Q: How do I know when the potatoes are cooked through?
A: The potatoes should be easily pierced with a fork without being mushy.
Q: Can I prepare some of the ingredients ahead of time?
A: Yes, you can chop the corn and onion, smash the garlic, and even peel and devein the shrimp a few hours in advance. Keep perishable items refrigerated.