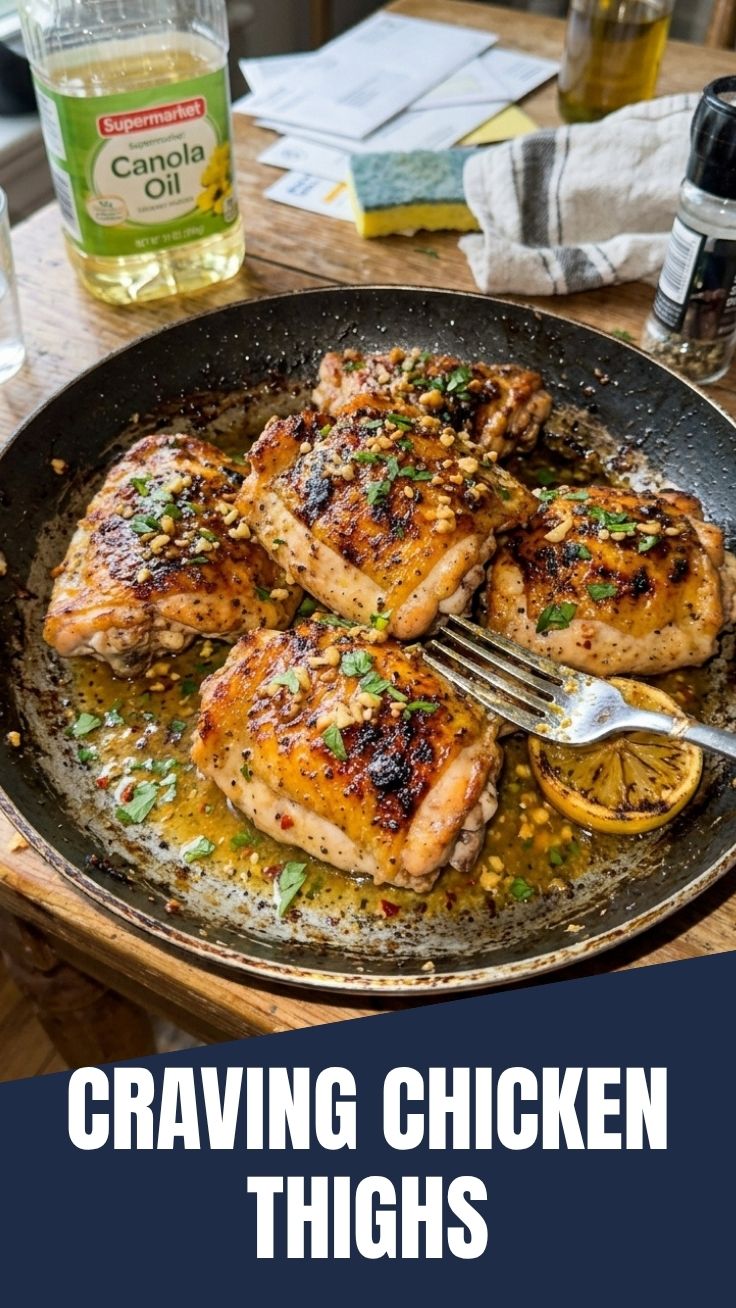
Sauté to Savor: Mastering Garlic Butter Chicken Thighs at Home
Are you tired of bland weeknight dinners and craving a dish that’s bursting with flavor, yet deceptively simple to prepare? Imagine sinking your teeth into incredibly tender, juicy chicken, imbued with a rich, aromatic garlic butter sauce. This isn’t just a dream; it’s the reality you can create in your own kitchen! Mastering Garlic Butter Chicken Thighs at home not only saves you money but also allows you to control the quality of ingredients, ensuring a wholesome and delicious meal for your family. Forget takeout and embrace the joy of home cooking, where achieving perfectly crispy chicken thighs is within your reach.
Ingredients & Kitchen Tools
- Bone-in, Skin-on Chicken Thighs (4-6 pieces): Essential for rich flavor and maintaining moisture. The skin will crisp up beautifully.
- Unsalted Butter (4 tbsp): Provides a rich, creamy base for our garlic butter sauce.
- Garlic (4-6 cloves, minced): The star of the show! Use fresh garlic for the best aroma and flavor.
- Fresh Parsley (2 tbsp, chopped): Adds a vibrant pop of color and a fresh, herbaceous note.
- Lemon (1/2, juiced): Brightens the sauce and cuts through the richness of the butter.
- Olive Oil (1 tbsp): For searing the chicken to achieve that golden-brown crust.
- Salt & Freshly Ground Black Pepper (to taste): Basic seasonings to enhance all the flavors.
- Optional: Paprika (1/2 tsp): For a subtle smoky flavor and beautiful color.
- Optional: Chicken Broth (1/4 cup): To create a more abundant sauce for drizzling.
Kitchen Tools:
- Large Skillet (oven-safe, preferably cast iron): Crucial for searing on the stovetop and finishing in the oven.
- Tongs: For easy handling of the chicken.
- Meat Thermometer: Ensures chicken is cooked to a safe internal temperature (165°F/74°C).
- Small Bowl: For mixing seasonings.
- Cutting Board & Knife: For prepping ingredients.
Prep Time & Cooking Schedule
- Prep Time: 15 minutes
- Cook Time: 25-30 minutes (including searing and baking)
- Resting Time: 5 minutes
This recipe is perfect for a weeknight, as it’s relatively quick from start to finish. You can marinate the chicken with salt, pepper, and paprika for 30 minutes to an hour (or even overnight) to deepen the flavor, but it’s not essential. Always allow the chicken to rest for 5 minutes after cooking; this redistributes the juices, ensuring a supremely moist result. Preheat your oven to 400°F (200°C) as you begin prepping your ingredients to streamline the cooking process.
Step-by-Step Instructions
1. Prepare the Chicken: Pat the chicken thighs thoroughly dry with paper towels. This step is critical for achieving that desirable crispy skin. Season generously with salt, black pepper, and optional paprika on both sides.
2. Sear the Chicken: Heat olive oil in a large, oven-safe skillet over medium-high heat. Once shimmering, place the chicken thighs skin-side down in the hot skillet. Sear for 6-8 minutes, undisturbed, until the skin is deeply golden brown and crispy chicken thighs begin to form.
3. Flip and Sauté: Flip the chicken thighs and cook for another 2-3 minutes on the other side.
4. Make the Garlic Butter Sauce: Reduce heat to medium-low. Add butter and minced garlic to the skillet, stirring until the butter melts and the garlic becomes fragrant (about 1 minute). Be careful not to burn the garlic. Squeeze in fresh lemon juice and stir in chopped parsley. If using, pour in the chicken broth.
5. Finish in the Oven: Baste the chicken with the garlic butter sauce. Transfer the skillet to the preheated oven. Bake for 15-20 minutes, or until the internal temperature of the Garlic Butter Chicken Thighs reaches 165°F (74°C) using a meat thermometer.
6. Rest and Serve: Remove the skillet from the oven. Carefully transfer the chicken to a cutting board or platter and let it rest for 5 minutes. Spoon extra garlic butter sauce from the skillet over the rested chicken before serving.
Nutritional Benefits & Advantages
Chicken thighs are a fantastic source of protein, essential for muscle repair and growth. Being a dark meat, they are richer in iron and zinc compared to chicken breast. The healthy fats from the chicken skin (when consumed in moderation) and butter provide satiety and energy. Garlic is renowned for its immune-boosting properties and heart-healthy compounds, while parsley adds a good dose of vitamins K, C, and A. This dish offers a balanced nutritional profile for a satisfying main course.
Tips, Variations & Cooking Advice
- Spice It Up: Add a pinch of red pepper flakes to the garlic butter sauce for a subtle kick.
- Herb Variations: Rosemary or thyme can be substituted for or added alongside parsley for different aromatic profiles.
- Creamy Sauce: Stir in a tablespoon of heavy cream at the end for an even richer, creamier sauce.
- Vegetable Addition: Sauté some asparagus, broccoli florets, or spinach in the pan after removing the chicken, allowing them to absorb the delicious garlic butter.
- Gluten-Free/Dairy-Free: This recipe is naturally gluten-free. For a dairy-free version, substitute butter with a high-quality dairy-free butter alternative.
Common Mistakes to Avoid
- Not Patting Chicken Dry Enough: This is the most common mistake preventing crispy skin. Moisture is the enemy of crispiness!
- Overcrowding the Pan: If you put too many chicken thighs in the skillet, it lowers the pan’s temperature, leading to steaming instead of searing, and a lack of crispy skin. Cook in batches if necessary.
- Burning the Garlic: Minced garlic cooks quickly. Keep an eye on it and reduce heat as needed to prevent it from burning, which can turn it bitter.
- Not Resting the Chicken: Skipping the resting step means the juices will escape when you cut into the chicken, resulting in a drier dish. Patience is a virtue here!
Storage & Meal Prep Tips
Leftover Garlic Butter Chicken Thighs can be stored in an airtight container in the refrigerator for up to 3-4 days. For reheating, gently warm in the oven at 300°F (150°C) for 10-15 minutes or in a skillet on the stovetop over low heat until warmed through to prevent drying out. Adding a splash of chicken broth or water can help maintain moisture. Freezing is possible for up to 2-3 months, though the skin may lose some of its crispiness upon thawing and reheating. Thaw overnight in the refrigerator before reheating.
Conclusion
Mastering Garlic Butter Chicken Thighs is a culinary triumph that will elevate your home cooking and impress anyone you share it with. This recipe delivers big on flavor with minimal effort, rewarding you with succulent, aromatic chicken and wonderfully crispy chicken thighs every time. We encourage you to try this simple yet elegant dish and discover the joy of creating restaurant-quality food in your own kitchen! Share your results in the comments below or tag us on social media—we love to see your creations!
FAQs
Q1: Can I use boneless, skinless chicken thighs?
A1: Yes, you can, but the cooking time will be shorter, and you’ll miss out on the rich flavor and crispy texture that bone-in, skin-on thighs provide. Adjust cooking time accordingly.
Q2: What can I serve with this dish?
A2: These chicken thighs pair wonderfully with creamy mashed potatoes, roasted vegetables (like asparagus or green beans), a simple side salad, or fluffy rice to soak up the delicious garlic butter sauce.
Q3: My chicken skin isn’t getting crispy. What’s wrong?
A3: Ensure your chicken is patted extremely dry before searing, the pan is hot enough before adding the chicken, and you’re not overcrowding the skillet. Also, avoid constantly flipping the chicken; let it sear undisturbed for several minutes.
Q4: Can I prepare the garlic butter sauce ahead of time?
A4: You can mince the garlic and chop the parsley ahead of time. However, it’s best to assemble and cook the garlic butter sauce fresh in the pan after searing the chicken for optimal flavor and aroma.