Master the Art of the Perfect Smoked Brisket: Your Ultimate Home BBQ Guide
Ever dreamt of carving into a perfectly tender, melt-in-your-mouth Smoked Brisket right in your own backyard? The allure of authentic Texas BBQ often feels like a culinary challenge best left to pitmasters, but I’m here to tell you that achieving phenomenal results at home is entirely within your reach. This comprehensive guide will demystify the smoking process, transforming a humble cut of meat into an extraordinary gastronomic experience. Preparing this dish yourself isn’t just about saving money; it’s about the pure satisfaction of mastering a beloved tradition, controlling every flavor nuance, and impressing your loved ones with a meal that speaks volumes about your culinary dedication. Get ready to embark on a flavorful journey that will elevate your barbecue game significantly!
Ingredients & Kitchen Tools
Crafting restaurant-quality Smoked Brisket requires a specific arsenal of ingredients and tools. Here’s what you’ll need:
Ingredients:
- 1 whole packer brisket (12-16 lbs): This cut includes both the flat and the point, crucial for optimal flavor and texture. Look for good marbling.
- Coarse salt (kosher or sea salt): Essential for a good bark and seasoning.
- Coarse black pepper: The other half of the classic “Dalmatian rub.”
- Garlic powder (optional): Adds another layer of savory depth.
- Onion powder (optional): Complements the garlic and pepper.
- Beef broth or apple cider vinegar: Used for spritzing, keeping the brisket moist and adding flavor.
- Wood chunks or chips (oak, hickory, mesquite): The soul of any smoked dish; choose according to your flavor preference. Oak is a classic for Texas BBQ.
Kitchen Tools:
- Smoker (pellet, offset, or electric): The primary piece of equipment for low-and-slow cooking.
- Sharp boning knife or trim knife: For preparing the brisket.
- Large cutting board: Essential for handling the sizable brisket.
- Meat thermometer (leave-in probe thermometer + instant-read): Non-negotiable for monitoring internal temperature accurately.
- Spray bottle: For spritzing the brisket during the smoke.
- Aluminum foil, butcher paper, or foil pan: For wrapping the brisket during the stall. Butcher paper is often preferred for maintaining bark.
- Heat-resistant gloves: For handling hot meat.
- Large cooler: For the crucial resting period.
- Large slicing knife: For carving the cooked brisket against the grain.
Prep Time & Cooking Schedule
Planning is paramount for this undertaking. While the results are incredibly rewarding, patience is key.
- Prep Time: 30-45 minutes (trimming and seasoning)
- Cook Time: 10-16 hours (depending on brisket size and smoker temperature)
- Resting Time: 2-4 hours (crucial for tenderness)
Total Time: Approximately 13-21 hours. Start early! Many pitmasters begin around midnight for a lunchtime or early dinner serving.
Step-by-Step Instructions
1. Trim the Brisket: Using a sharp knife, remove excess hard fat, especially from the flat. Aim for a 1/4-inch fat cap on the top to help keep it moist. Square off the edges to promote even cooking.
2. Season Generously: Apply a liberal coating of coarse salt, pepper, and optional garlic/onion powder. Don’t be shy; the brisket can take a lot of seasoning. This classic “Dalmatian” rub is the hallmark of real Texas BBQ.
3. Preheat Your Smoker: Get your smoker up to a stable 225-250°F (107-121°C). Once stable, add your wood chunks.
4. Smoke the Brisket: Place the Smoked Brisket fat-side up on the grates. Insert a probe thermometer into the thickest part of the flat, avoiding major fat pockets. Let it smoke, maintaining a consistent temperature.
5. Spritzing Phase: After 3-4 hours, or when the bark has set, begin spritzing the brisket every 45-60 minutes with beef broth or apple cider vinegar. This keeps the surface moist and helps with bark development.
6. The Stall & Wrapping: Around 150-170°F (65-77°C) internal temperature, your brisket will hit “the stall” where its temperature plateaus. At this point, remove it and wrap it tightly in butcher paper or aluminum foil. This pushes it through the stall and locks in moisture. Return to the smoker.
7. Cook to Tenderness: Continue cooking until the internal temperature reaches 200-205°F (93-96°C) and the brisket feels probe tender – the probe should slide in with little to no resistance, like butter.
8. The Crucial Rest: Transfer the wrapped brisket to a preheated cooler (without ice packs) and let it rest for at least 2 hours, ideally 3-4 hours. This allows the muscle fibers to relax and reabsorb juices, resulting in unparalleled tenderness. Do not skip this step!
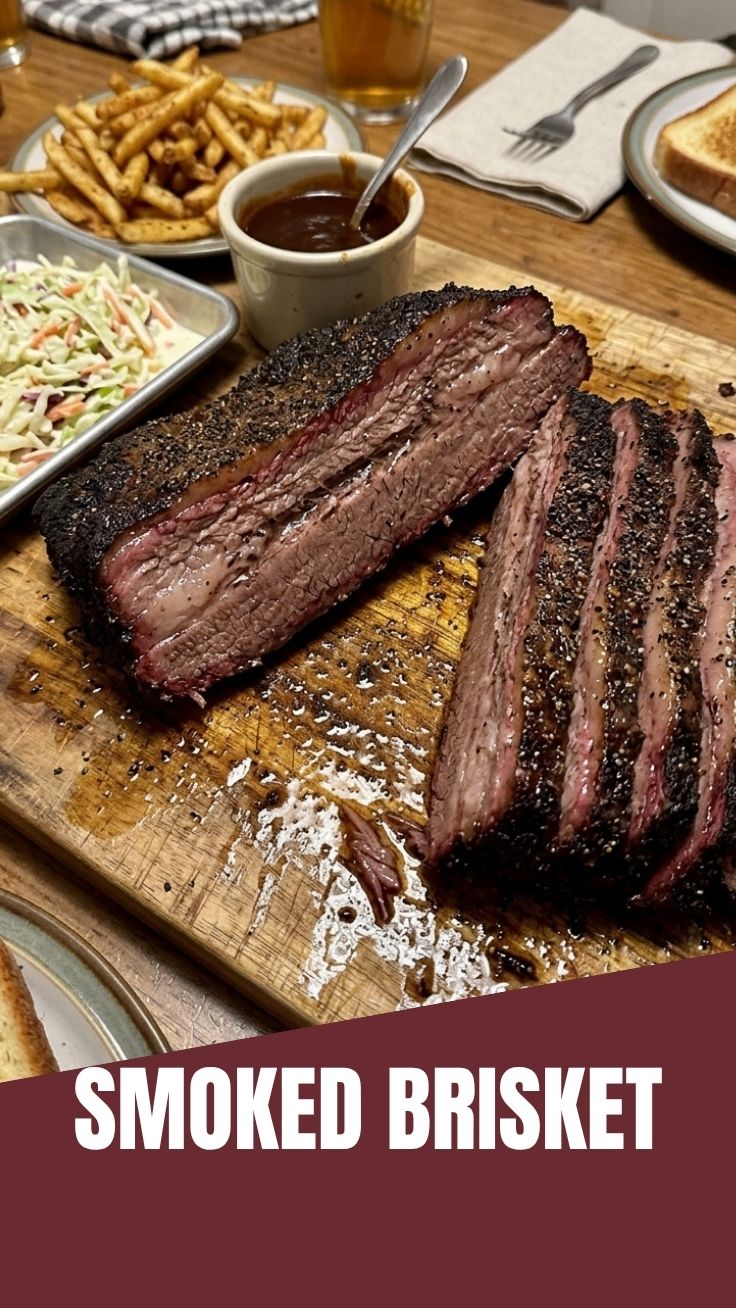
9. Slice and Serve: Unwrap the brisket. You’ll notice two muscle groups (flat and point) with grains running in different directions. Separate them and slice against the grain for both. Serve immediately.
Nutritional Benefits & Advantages
Brisket, while a fatty cut, offers significant nutritional benefits when consumed in moderation. As a red meat, it’s an excellent source of high-quality protein, essential for muscle repair and growth. It’s also rich in vital iron, crucial for oxygen transport, and zinc, which supports immune function. Furthermore, brisket contains numerous B vitamins like B12 (for nerve health) and niacin (energy metabolism). Smoking at home allows you to control the ingredients, avoiding excessive sodium or unhealthy additives often found in commercially prepared versions. The low and slow cooking method also renders out some of the fat, leaving you with tender, flavorful meat.
Tips, Variations & Cooking Advice
- Wood Selection: For a truly authentic experience, pair oak or hickory with your brisket. Mesquite offers a stronger, more intense smoke flavor; use sparingly if you prefer a milder taste.
- Moisture Management: Don’t just rely on spritzing. Consider placing a water pan in your smoker to help maintain humidity, especially in dry climates.
- Bark Formation: For a darker, crispier bark, consider an unwrapped finish for the last hour of cooking, especially if you used butcher paper for the stall.
- Injecting: For added moisture and flavor, some pitmasters inject their briskets with beef broth or a savory solution before smoking.
- Leftovers: Don’t let any go to waste! Leftover brisket makes incredible sandwiches, tacos, chili, or even breakfast hash.
Common Mistakes to Avoid
- Under-trimming or Over-trimming: Too much fat prevents bark formation; too little fat can lead to a dry brisket. Aim for that 1/4-inch fat cap.
- Irregular Smoker Temperature: Fluctuations lead to inconsistent cooking. Invest in a good thermometer and trust your smoker.
- Not Trusting the Stall: It’s frustrating, but it’s a natural process. Don’t crank up the heat dramatically, just wrap and wait.
- Skipping the Rest: This is arguably the most critical step for tenderness. A short rest results in dry, tough meat as juices escape when sliced.
- Slicing with the Grain: This is a cardinal sin! Always slice against the grain to ensure tender, easy-to-chew pieces.
Storage & Meal Prep Tips
Proper storage ensures your hard work doesn’t go to waste.
- Refrigeration: Store leftover smoked brisket in airtight containers for up to 3-4 days. For best results, slice only what you plan to eat and store larger pieces whole to maintain moisture.
- Freezing: Brisket freezes exceptionally well. Wrap individual portions tightly in plastic wrap, then aluminum foil, and place in freezer-safe bags. It can be frozen for up to 3 months.
- Reheating: To maintain texture, reheat slowly. For sliced brisket, add a splash of beef broth or water, cover, and reheat gently in the oven (around 250°F/120°C) until warmed through. Alternatively, use a sous vide bath for incredibly tender reheating. Avoid high heat or microwaving without moisture, as it can dry out the meat.
Conclusion
Congratulations, future pitmaster! You’ve just unlocked the secrets to creating an exceptional Smoked Brisket that rivals any restaurant. This journey through the art of low-and-slow cooking, steeped in the traditions of Texas BBQ, proves that with patience, precision, and passion, you can truly create culinary magic in your own backyard. Don’t be intimidated by the cook time; the reward of a perfectly tender, smoky, and flavorful brisket is immeasurable. Give this recipe a try, share your triumphs, and savor every magnificent bite. Your barbecue reputation is about to soar!
FAQs
Q1: What’s the difference between the brisket flat and point?
A1: The flat is the leaner, rectangular part, ideal for slicing. The point is thicker, fattier, more marbled, and often used for pulled brisket or burnt ends after separation.
Q2: My smoker temperature fluctuates a lot. What can I do?
A2: Ensure your smoker is well-sealed. Avoid opening the lid often. For charcoal smokers, manage air vents carefully. Consider using a temperature controller for more stability on electric or pellet smokers.
Q3: How do I know when the brisket is truly “probe tender”?
A3: When inserting an instant-read thermometer or skewer, it should slide into the meat with very little resistance, much like pushing it into softened butter. This is a better indicator of doneness than just relying on temperature alone.
Q4: Can I use a dry rub without sugar?
A4: Absolutely! The classic Texas BBQ rub is just salt and pepper (often called “Dalmatian rub”). Sugar can be added for caramelization, but it’s not essential, and many prefer a sugar-free rub.
Q5: What if I don’t have a cooler for resting?
A5: While a cooler is ideal for maintaining temperature, you can create a makeshift resting environment by wrapping the brisket in multiple layers of foil and towels, then placing it in an oven that has been turned off but is still warm (not hot).