Unlock Breakfast Bliss: Your Guide to the Perfect Dutch Baby Pancake
Have you ever wished for a breakfast that feels effortlessly gourmet, yet takes minimal effort? Prepare to elevate your morning routine with the delightful Dutch Baby Pancake. This culinary marvel, often mistaken for an oversized popover, offers an impressive presentation and a melt-in-your-mouth texture. But beyond its stunning appearance, preparing this at home offers a deeply satisfying experience – a chance to craft a comforting, golden-brown masterpiece that fills your kitchen with an irresistible aroma. It’s an opportunity to create a memorable meal that rivals any fancy brunch spot, all from the comfort of your own home. And for those who love exploring similar delights, mastering the German Pancake opens up a whole new world of breakfast possibilities.
Ingredients & Kitchen Tools
Crafting the perfect Dutch Baby Pancake requires a few simple staples and essential tools.
- 3 large eggs: For structure and richness.
- 1/2 cup all-purpose flour: The base of our pancake.
- 1/2 cup milk (whole or 2%): Adds moisture and tenderizes the batter. Keep it at room temperature for best results.
- 1 tablespoon granulated sugar: Balances the flavor and aids in browning. Optional, but recommended.
- 1/2 teaspoon vanilla extract: Enhances the aroma and taste.
- 1/4 teaspoon salt: Brightens all the flavors.
- 3 tablespoons unsalted butter: Crucial for greasing the pan and creating that irresistible crispy edge.
Kitchen Tools:
- 10-inch cast iron skillet: The quintessential tool for a Dutch Baby Pancake. Its excellent heat retention is key for optimal puff. Alternatively, a heavy oven-safe skillet or baking dish can work. (Keep it well-seasoned!)
- Blender or large mixing bowl and whisk: For a smooth, lump-free batter. A blender is recommended for maximum aeration.
- Measuring cups and spoons: For precise ingredient measurements.
- Oven mitts: For safely handling a hot skillet.
Optional Substitutions:
- Gluten-free flour blend: For a gluten-free version. Ensure it contains xanthan gum.
- Plant-based milk (almond, soy, oat): For a dairy-free option.
- Coconut oil or vegan butter: As a dairy-free butter alternative.
Prep Time & Cooking Schedule
This recipe shines in its simplicity and speed, making it ideal for both leisurely weekends and special weekday treats.
- Prep Time: 5-7 minutes (actual mixing time)
- Cook Time: 20-25 minutes
- Resting Time: None required for the batter, but we will preheat the skillet to achieve that signature puff.
To plan your perfect breakfast, begin by preheating your oven and skillet simultaneously. This ensures the skillet is piping hot when the batter hits it, which is crucial for the dramatic rise of the Dutch Baby Pancake. While the oven preheats, quickly blend your ingredients. Once the skillet is ready, pour in the batter and watch the magic unfold!
Step-by-Step Instructions
Follow these steps to achieve a perfectly puffed and golden Dutch Baby Pancake, a true breakfast spectacle. This process is very similar to preparing a fantastic German Pancake, focusing on high heat and a rich batter.
1. Preheat Oven & Skillet: Place your 10-inch cast iron skillet on a rack in the center of your oven. Preheat the oven to 425°F (220°C). Allow the skillet to heat for at least 10-15 minutes while the oven preheats; this is crucial for the pancake’s dramatic puff.
2. Combine Ingredients: In a blender, combine the eggs, flour, milk, sugar, vanilla extract, and salt. Blend on high speed for about 30 seconds to 1 minute, until the batter is completely smooth and airy. Alternatively, whisk vigorously in a large bowl until no lumps remain. The batter should have the consistency of thin cream.
3. Melt Butter: Carefully remove the hot skillet from the oven using oven mitts. Add the 3 tablespoons of butter to the hot skillet. The butter will melt and sizzle immediately. Swirl the butter around the pan to evenly coat the bottom and sides.
4. Pour Batter & Bake: Immediately pour the prepared batter into the hot, buttered skillet. Place the skillet back into the preheated oven.
5. Bake to Perfection: Bake for 20-25 minutes, or until the pancake is dramatically puffed, deeply golden brown around the edges, and slightly set in the center. Avoid opening the oven door during the first 15 minutes, as this can cause the pancake to deflate.
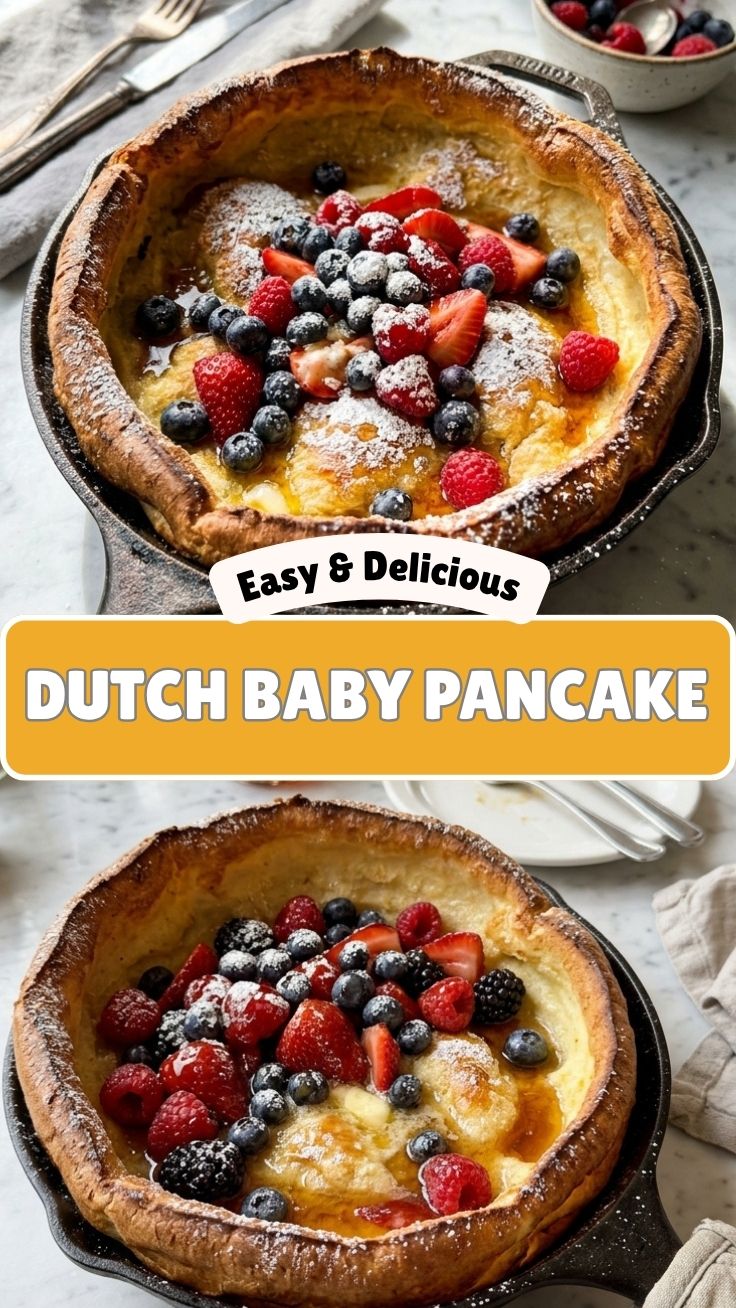
6. Serve Immediately: Carefully remove the skillet from the oven. The pancake will begin to deflate almost immediately upon cooling, which is perfectly normal. Serve hot with your favorite toppings!
Nutritional Benefits & Advantages
Beyond its stunning appearance, the Dutch Baby Pancake offers several nutritional advantages. Made with eggs and milk, it provides a good source of protein, crucial for muscle repair and satiety. The use of basic, wholesome ingredients means you’re avoiding many of the artificial additives found in pre-made breakfast options. When topped with fresh fruits, it becomes a fantastic vehicle for vitamins, fiber, and antioxidants, turning a simple breakfast into a nutrient-rich start to your day. It’s also easily adaptable to various dietary needs, allowing for gluten-free or dairy-free adjustments without sacrificing flavor or texture.
Tips, Variations & Cooking Advice
- Flavor Boosts: A sprinkle of nutmeg or cinnamon in the batter can add warmth.
- Sweet Toppings: Classic toppings include powdered sugar, fresh berries, sliced fruit (bananas, apples), maple syrup, honey, or a squeeze of lemon juice (surprisingly delicious!).
- Savory Variations: For a savory twist, omit the sugar and vanilla, then top with cheese, sautéed mushrooms, herbs, or even a fried egg.
- Mini Dutch Babies: Pour the batter into individual ramekins or a muffin tin for perfect single servings. Adjust baking time accordingly.
- Gluten-Free: Use a 1:1 gluten-free flour blend.
- Dairy-Free: Substitute milk with your preferred plant-based milk and butter with coconut oil or vegan butter.
- Temperature Control: A hot oven and a sizzling skillet are non-negotiable for that signature puff. Don’t rush the preheating!
Common Mistakes to Avoid
- Cold Skillet: Pouring batter into a cold or lukewarm skillet will result in a flat, dense pancake. Always preheat your skillet thoroughly.
- Opening Oven Door: Resist the urge to peek during the first 15 minutes of baking. The sudden temperature drop can cause the pancake to collapse.
- Over-mixing the Batter: While a blender helps, over-mixing can develop too much gluten, leading to a tougher pancake. Blend just until smooth.
- Incorrect Oven Temperature: An oven that isn’t hot enough will prevent proper rising. Ensure your oven is accurately calibrated.
- Serving Cold: The magic of a Dutch Baby Pancake is in its freshly baked, puffed glory. Serve it immediately!
Storage & Meal Prep Tips
While a Dutch Baby Pancake is best enjoyed fresh from the oven, you can store leftovers, though they will lose their signature crispness and puff.
- Refrigeration: Allow any leftover pancake to cool completely. Store in an airtight container in the refrigerator for up to 2-3 days.
- Freezing: Freezing is not ideal for maintaining texture.
- Reheating: To reheat, place individual portions on a baking sheet and warm in a preheated oven at 350°F (175°C) for 5-10 minutes, or until heated through. Microwaving is possible but will yield a softer, less appealing texture. For meal prep, consider preparing the dry batter ingredients ahead of time and mixing with wet ingredients just before baking.
Conclusion
Mastering the Dutch Baby Pancake is a rewarding culinary journey that promises a visually stunning and incredibly delicious reward. Its puffed, golden edges and tender center make it an unforgettable breakfast or brunch center piece. With just a few simple ingredients and a hot oven, you can create a dish that feels both elegant and comforting. Don’t be shy – dive in and experience the joy of this magnificent pancake, perhaps even experimenting with a German Pancake next. Share your creations and favorite topping combinations in the comments below! Happy baking!
FAQs
Q1: Why didn’t my Dutch Baby Pancake puff up?
A1: The most common reasons are an insufficiently hot oven or skillet, or opening the oven door too early. Ensure your oven is fully preheated and your cast iron skillet is sizzling hot before adding the batter.
Q2: Can I make the batter ahead of time?
A2: While you can combine the dry ingredients and store them, it’s best to mix the wet ingredients (eggs, milk, vanilla) with the dry just before baking. The gluten develops quickly in the wet batter, and it won’t puff as well if left to sit.
Q3: What kind of skillet is best for a Dutch Baby?
A3: A well-seasoned 10-inch cast iron skillet is ideal. Its excellent heat retention and oven-safe nature are key to the pancake’s dramatic rise and crispy edges.
Q4: Can I make this a sweet or savory dish?
A4: Absolutely! For sweet, top with powdered sugar, fruit, or syrup. For savory, omit sugar and vanilla from the batter, then top with cheese, herbs, or even bacon and eggs.
Q5: My Dutch Baby deflated once I took it out of the oven. Is that normal?
A5: Yes, it is perfectly normal for a Dutch Baby Pancake to deflate immediately after being removed from the oven. This is part of its charm and doesn’t affect the delicious flavor or texture. Serve it quickly for the best experience!